How to Add Page Numbers in Word
Adding page numbers to your Microsoft Word document is a simple but essential step—especially for longer files like reports, research papers, or eBooks. Page numbers help keep your document organized and make it easier for readers to navigate. Here’s how to do it:
Step-by-Step: Adding Page Numbers
1. Open Your Document
Start by opening your Word document.
2. Go to the “Insert” Tab
At the top of the screen, click on the Insert tab in the ribbon menu.
3. Click “Page Number”
In the Header & Footer group, find and click on Page Number.
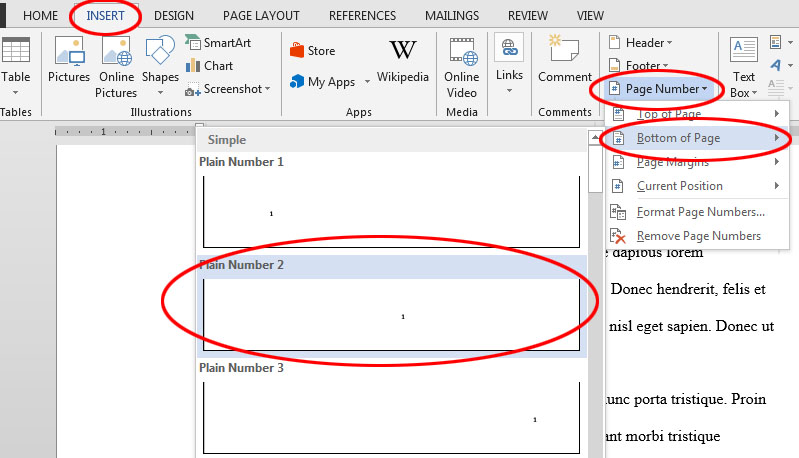
4. Choose the Position
A dropdown menu will appear. You can select from:
- Top of Page (e.g., header)
- Bottom of Page (e.g., footer)
- Page Margins
- Current Position (where your cursor is)
After selecting a location, choose the style you prefer (e.g., centered, left, right).
5. Customize if Needed
Once you insert page numbers, the header or footer section will open automatically. You can:
- Double-click the header/footer area to make changes
- Use the Design tab to customize further
- Check Different First Page if you don’t want numbering on the title page
6. Close Header and Footer
When you’re done, click Close Header and Footer or double-click back into the main body of your document.
Advanced Tips
- Start Numbering from a Specific Page:
Use Layout > Breaks > Next Page to separate sections. Then go to the header/footer of the new section, click Page Number > Format Page Numbers, and set the start number. - Format Page Numbers:
In the Page Number menu, choose Format Page Numbers to change the number format (e.g., Roman numerals, letters).
Conclusion
That’s it! You’ve successfully added page numbers to your Word document. Whether you’re preparing a school paper or a professional report, properly formatted page numbers improve readability and give your work a polished look.