

A shared mailbox in Microsoft Outlook allows multiple users to read and send emails from a common address, such as support@company.com or sales@company.com. Shared mailboxes are widely used by teams that need collaborative access to customer inquiries, bookings, or internal communication.
This guide explains how to add a shared mailbox in Outlook on Windows, Outlook for Mac, and Outlook on the web.
What Is a Shared Mailbox?
A shared mailbox is a mailbox that several people can access using their own Outlook accounts. Users with permission can:
- Read incoming emails
- Send emails from the shared address
- Reply as the shared mailbox
- Access shared folders and calendars
Unlike a regular mailbox, a shared mailbox usually does not require a separate username and password for daily use.
Before You Start
Before adding a shared mailbox, make sure:
- Your Microsoft 365 administrator has granted you access
- You are signed into the correct Outlook account
- Outlook is updated to the latest version
If the mailbox does not appear automatically, you can add it manually using the steps below.
How to Add a Shared Mailbox in Outlook on Windows
Follow these steps in the desktop version of Outlook for Windows:
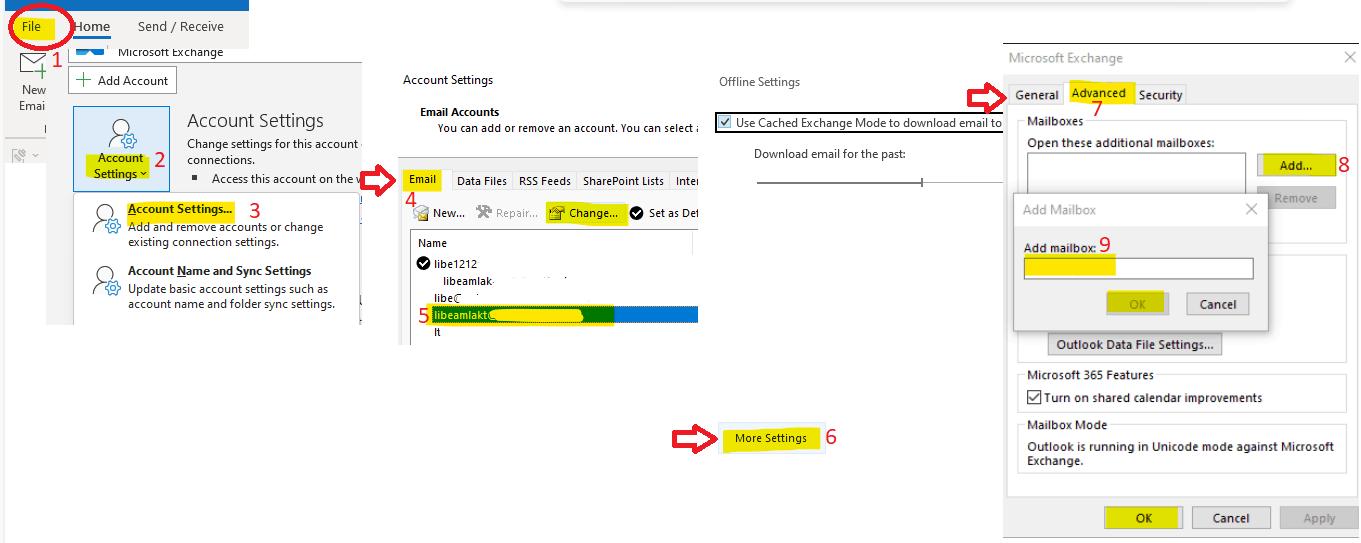
You open Outlook.
- Click File in the top-left corner.
- Select Account Settings → Account Settings.
- Choose your email account and click Change.
- Click More Settings.
- Open the Advanced tab.
- Under “Open these additional mailboxes,” click Add.
- Type the shared mailbox email address.
- Click OK → Next → Finish.
- Restart Outlook.

After restarting, the shared mailbox should appear in the left sidebar.
How to Add a Shared Mailbox in Outlook for Mac
To add a shared mailbox in Outlook for Mac:
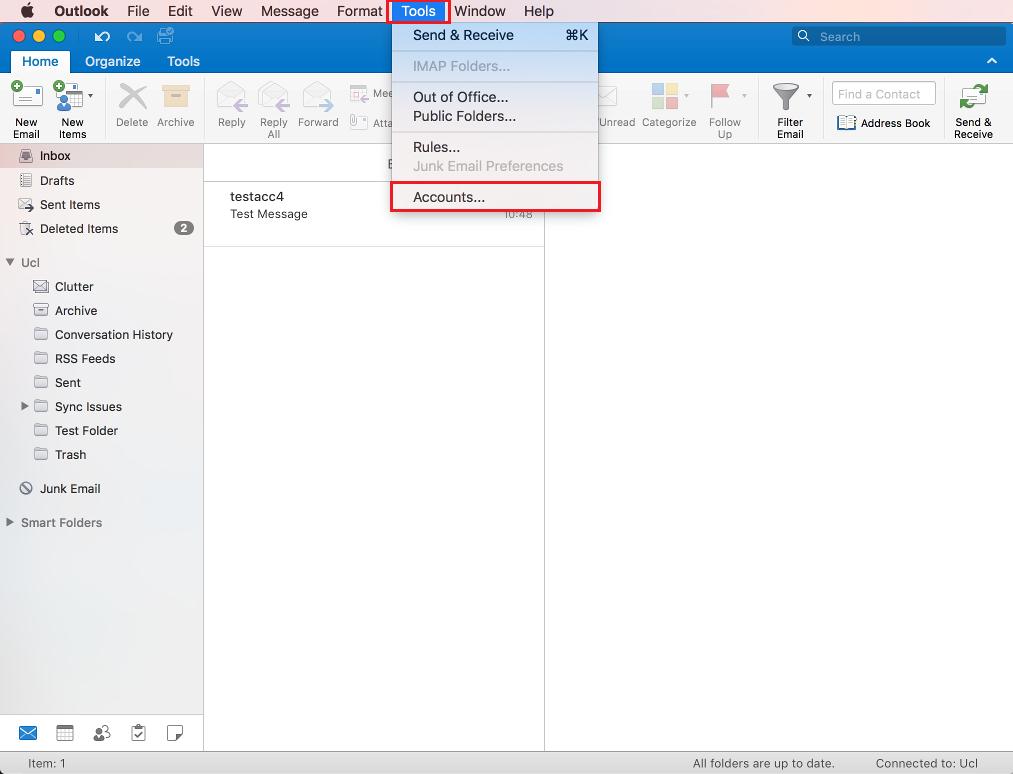
- Open Outlook.
- Go to Tools → Accounts.
- Select your Microsoft 365 account.
- Click Delegation and Sharing.
- Choose the Shared With Me tab.
- Click the + button.
- Enter the shared mailbox name or email address.
- Click Add.
The mailbox should appear in your folder list shortly afterward.
How to Add a Shared Mailbox in Outlook Web App (OWA)


4
If you use Outlook in a browser:
- Sign in to Outlook on the web.
- In the left navigation pane, right-click Folders.
- Select Add shared folder or mailbox.
- Enter the shared mailbox email address.
- Click Add.
The shared mailbox will appear in the navigation panel.
How to Send Emails From a Shared Mailbox
Once the mailbox is added:
- Create a new email.
- Click the From field.
- Select the shared mailbox address.
- Compose and send your message.
If the “From” field is missing:
- In Outlook, open a new email
- Go to the Options tab
- Enable From
Shared Mailbox Not Showing Up?
If the mailbox does not appear, try these fixes:
Wait for Microsoft 365 Sync
Sometimes permissions take up to an hour to sync.
Restart Outlook
Close Outlook completely and reopen it.
Remove and Re-Add the Mailbox
Go back to Account Settings and add it again manually.
Verify Permissions
Ask your Microsoft 365 admin to confirm you have:
- Full Access permission
- Send As or Send on Behalf permission
Common Shared Mailbox Issues
Cannot Send From Shared Mailbox
This usually means you do not have “Send As” permission.
Outlook Keeps Asking for Password
Shared mailboxes typically do not use separate login credentials. Remove any manually saved passwords for that mailbox.
Shared Mailbox Is Slow
Large mailboxes with many folders may affect Outlook performance. Disabling cached mode for shared folders can help.
Tips for Managing Shared Mailboxes
- Create folders for different departments or projects
- Use categories and flags to organize emails
- Archive old conversations regularly
- Set mailbox rules to automate sorting
Teams that manage customer service or bookings often benefit from a clear folder structure and standardized email replies.
Final Thoughts
Adding a shared mailbox in Microsoft Outlook is a simple process once permissions are configured correctly. Whether you use Outlook on Windows, Mac, or the web, shared mailboxes make team collaboration much easier by centralizing communication in one place.
If the mailbox does not appear immediately, permissions or synchronization delays are usually the cause. After setup, you can send, receive, and organize emails just like a regular mailbox while collaborating with your team efficiently.